How to Enable ReadyBoost for an ExpressCard SSD in Vista

Sometimes after inserting a new SSD ExpressCard device into your Vista computer for the first time you may see the following message under the device’s “ReadyBoost” tab: “Device interface is not supported”. Do the following to enable ReadyBoost for the device (assuming the device is ReadyBoost compatible):

  1. Start up the “Disk Management” manager under: Right-click over Computer in the Start menu->Manage->Storage->Disk Management
  2. Find the SSD device and right-click over it to bring up its properties
  3. Select the Policies tab
  4. Choose the option “Optimize for performance”
  5. Drive will remount and ReadyBoost should now be enabled for the device

Note: You can change the policy back to the default of “Optimize for quick removal” and the ReadyBoost option will still be enabled for the device. So the fact that you have to initially change the policy for the device just to enable ReadyBoost is probably a bug. This behavior was observed on an HP Pavilion DV6871US notebook computer with an 8GB Lexar ExpressCard SSD.
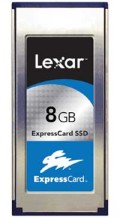
Lexar 8GB SSD

Sendmail Hangs When Starting Up or When Using It with PHP

If you notice Sendmail hanging up for many minutes while starting up at boot or while being used such as sending an email from a PHP script, it is probably a DNS lookup problem. Ensure your /etc/hosts file has the appropriate entries for your server that sendmail is running on:

127.0.0.1       localhost localhost.localdomain
192.168.1.80    www.foo.com www
192.168.1.80    www.foo.com.

Replace “www.foo.com” and “www” with your server’s fully qualified domain name and host name respectively. Replace “192.168.1.80” with the IP address of your server. The last entry with the “.” at the end is critical so don’t forget it.

Terminal


Mysqldump Error 29

If you try to backup a MySQL database with a lot of tables using mysqldump, you may get an error similar to the following:

mysqldump: Got error: 29: File './test/test.MYD' not found (Errcode: 24) when using LOCK TABLES

To fix the problem you can add the –skip-lock-tables option to your mysqldump command line like so:

mysqldump --skip-lock-tables -u root -p db_foo > db_foo_backup_13FEB09.sql

Or you can permanently fix the problem by increasing the number of open files allowed by your MySQL service by specifying a sufficiently large value for the open_files_limit setting in your MySQL server configuration file. The open_files_limit needs to be placed under the [mysqld] section of the MySQL server configuration file. On CentOS 5 the default location of the MySQL service configuration file is /etc/my.cnf. Try specifying a value of 8192 like so:

[mysqld]
open_files_limit = 8192

After you make the change to the MySQL server configuration file you’ll need to restart the MySQL service to put the changes into effect. On CentOS 5 you can restart the MySQL service with the following command:

service mysqld restart

MySQL logo

How to Mirror A Directory Locally Using Rsync

Most of the instructions for mirroring a directory with Rsync involve mirroring the data to a different server. You can also use Rsync to sync or mirror a directory on the same computer as the source directory.

Here is an example command on how to mirror two directories locally. In this example, /home/apache/public_html is the source directory and /home/apache/public_html_bak is the destination directory. Forward slashes at the end of the directory names in the rsync command are important so don’t forget them. The sync is one-way in that the destination will mirror the source:

rsync -avr --delete --links /home/apache/public_html/ /home/apache/public_html_bak/

If you need to preserve ACLs and Extended attributes then you need to add the -A and -X switches:

rsync -avrAX --delete --links /home/apache/public_html/ /home/apache/public_html_bak/

If you want to just do a dry run to see what will happen when you run Rsync, then add the -n switch:

rsync -avrAXn --delete --links /home/apache/public_html/ /home/apache/public_html_bak/

Terminal