macOS: How to Clear Cached MDM Enrollment Settings While in Setup Assistant

If you change a computer’s MDM configuration in Apple School Manager (ASM) or Apple Business Manager (ABM) after a computer has already started Setup Assistant, then the computer may be in a state where it is trying to enroll to a previously configured MDM server before you changed it in ASM/ABM. This may result in the computer giving a 500 MDM server connection error when you try to proceed past the “Remote Management” screen in Setup Assistant. Big Sur seems to not try to refresh this cached MDM info once it pulls it down for the first time. Not sure how later macOS versions behave in Setup Assistant. Big Sur and later versions of macOS make it a non-trivial process to delete the MDM cached info. For Big Sur and later do the following to clear out the Setup Assistant cached MDM enrollment settings:

  1. Boot the computer into Recovery Mode and then start the Terminal app while in Recovery Mode.
  2. In Terminal run the command: csrutil disable
  3. Reboot the computer and go into Recovery Mode again and launch the Terminal app.
  4. Delete the cached MDM enrollment data by running the following command: rm “/Volumes/Hard Drive – Data/private/var/db/ConfigurationProfiles/Settings/.cloudConfigRecordFound”
    • Change “Hard Drive – Data” to match the name of the data partition of the computer you are working on. It will be whatever you named the OS hard drive partition with “– Data” appended to the end of the name.
  5. Run the Terminal command: csrutil enable
  6. Reboot back into Setup Assistant and the cached MDM settings should now be gone and the computer will pull the latest settings from ASM/ABM again.

Sony Xperia 10 Plus – Microphone Does Not Work in Some Apps Such as Zoom or Viber After Android 10 Update

After updating to Android 10 from Android 9 on a Sony Xperia 10 Plus phone, you may notice some apps no longer able to use your phone’s microphone. When you attempt to use affected apps, the app will act like your microphone is not working on your phone. For example on affected phones, when you try to use the Zoom or Viber video conferencing apps, people will be able to see your video but not hear you talking.

Various Google search results may lead you to try to totally disable or remove/uninstall the “Google” or “Google Play Services” apps but this fix will cripple your phone and you will not be able to use some Google phone functions and apps. An alternative solution you may find is to just “deny” the microphone privileges to these apps but this will also cripple some functions of your phone. Yet another solution you may encounter in Google searches is to disable the Google Assistant’s “ok google” voice activation feature.

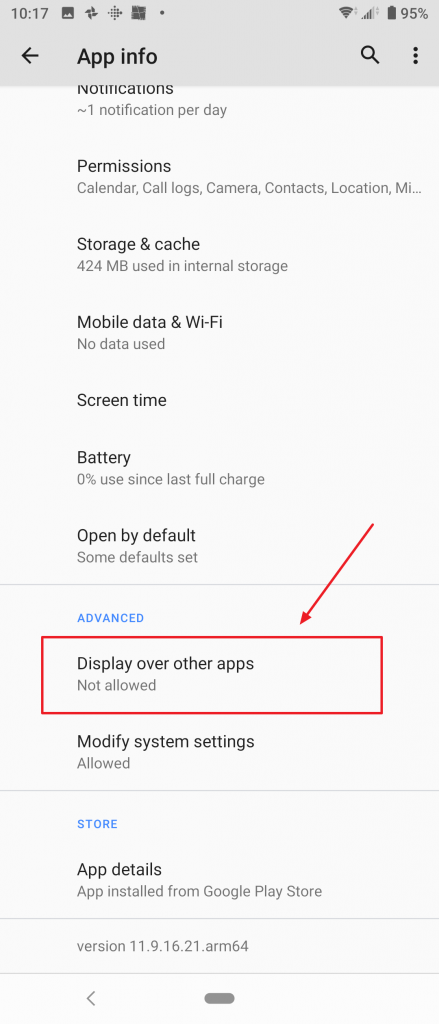
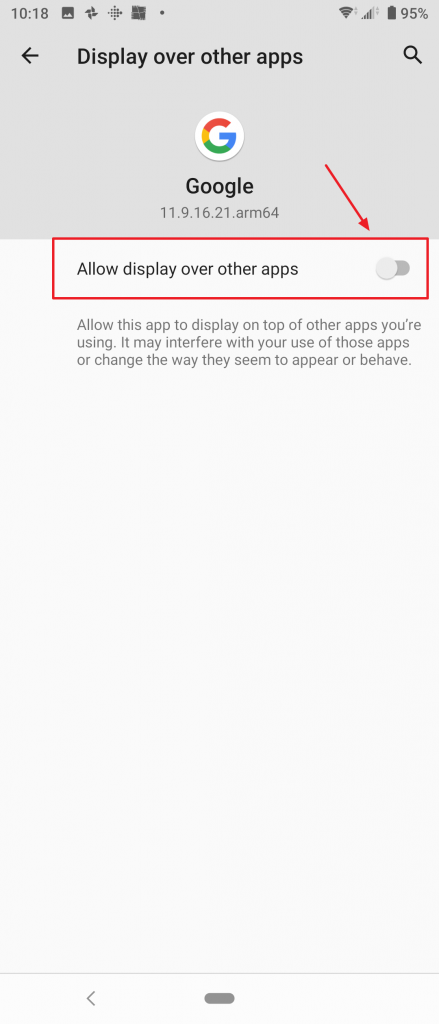
The best solution that worked for me is to disable the “Google” app permission for “Allow display over other apps“. Once I did this, all apps I was having problems with starting working again and from what I can tell all Google app related functions still work including the voice activation feature of Google Assistant. Even after a phone restart, everything still works. I believe what is happening is the “Google” app is running in the background and keeping a hold on the microphone. Only one app at a time can use the phone’s microphone so since the “Google” app is still running in the background and keeping a hold on the microphone, no other app can use it. Disabling the “Allow display over other apps” permission of the app allows other apps to take over use of the microphone when they are brought into the foreground.

Here is the step-by-step procedure to disable the “Allow display over other apps” permission for the “Google” app:

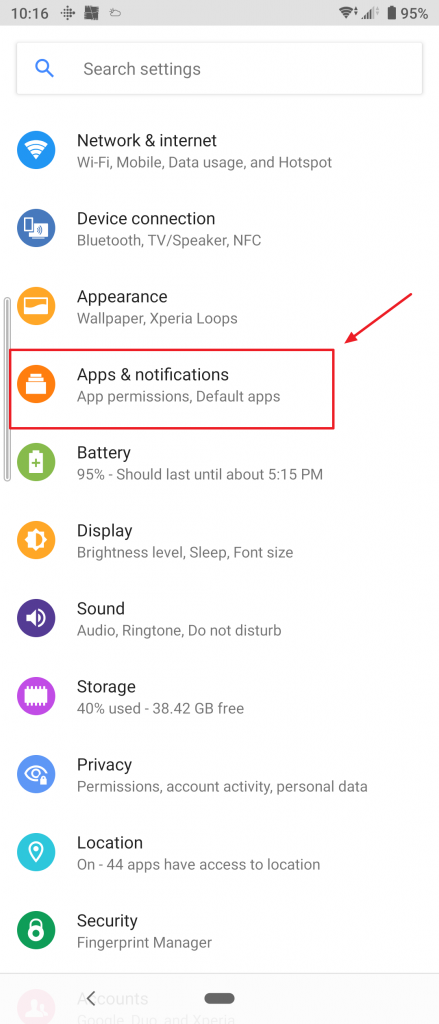
1. Go to your phone settings and then open the “Apps and notifications” settings

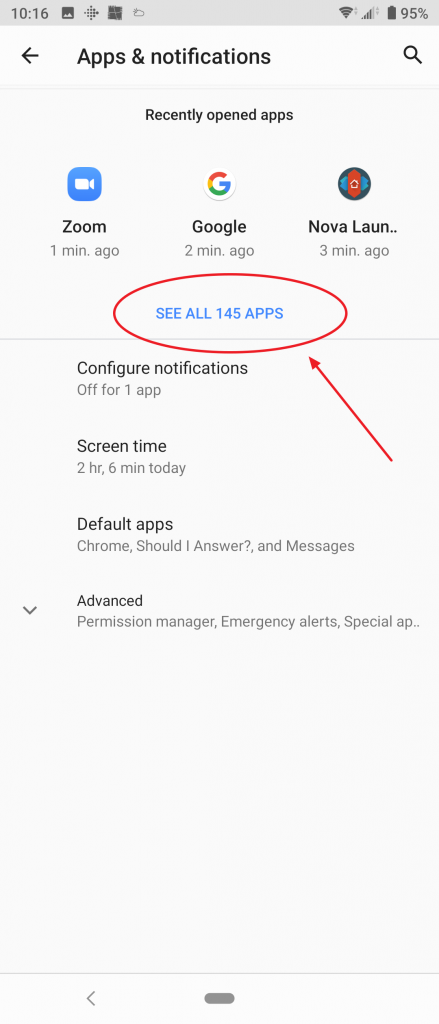
2. Click on the link to see all your apps

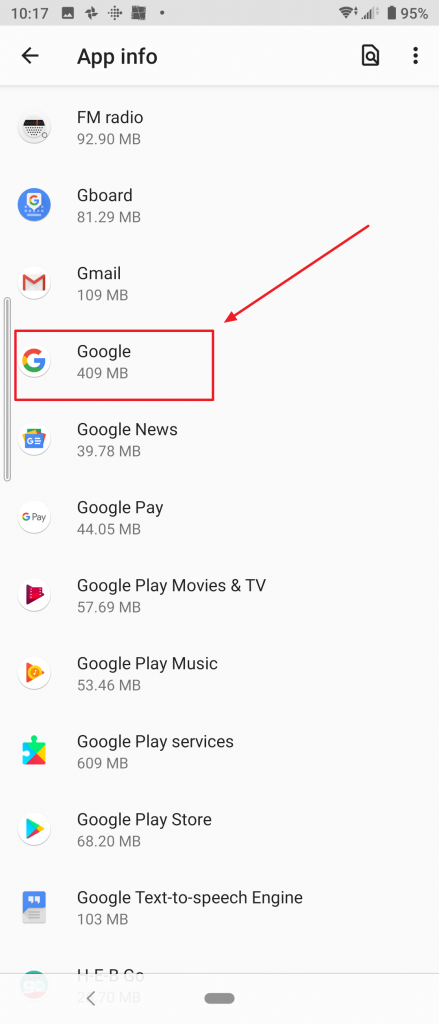
3. Find the “Google” app and click on it to open its settings

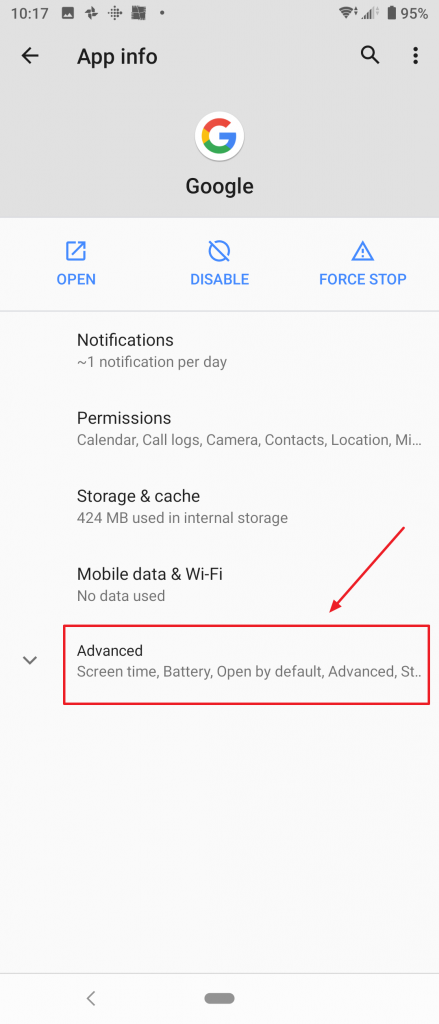
4. Click on the “Advanced” item to expand its settings

5. Ensure the “Display over other apps” setting is set to “Not allowed” in order to disable it

6. If the “Display over other apps” setting is enabled, click on the setting to open it and then disable it by clicking on the toggle button pointed out in the screenshot. When the setting it is disabled, the toggle button will appear grayed out as shown in the screenshot.

Sony Laptop BIOS Update Error – Cannot Read System Information

When attempting to run the Sony VAIO laptop BIOS update program you get the WBFLASH error “Cannot Read System Information”. This usually means you need to install the “Sony Shared Library” which should be a download under your laptop’s Sony support page. See Sony Knowledge Base article 36505 (Link). Once you download and install the Sony Shared Library files and restart your computer, try running the BIOS updater program again.

Web Help Desk – How to Reset The Password For the Admin User Account and Also Activate It

The first user account created in Web Help Desk is also the only user account that will remain active and useable if all of your technician licenses expire. So if you disabled the default admin user account in Web Help Desk when you purchased additional licenses and then you find yourself in the situation of your licenses expired you will be locked out of Web Help Desk since there are no active user accounts which can be used to log into it. If you are in this situation you will need to directly edit the Web Help Desk backend database to reset the default admin user account password and re-activate it. Here is the MySQL query for doing this. Execute it against your Web Help Desk database. You may need to adapt the query for your particular database backend server.

UPDATE TECH SET USER_NAME='admin', PASSWORD='password', use_ldap_authentication=0, INACTIVE=0, INCORRECT_AUTH_ATTEMPTS=0 where CLIENT_ID=1;

The above SQL query will set the username of the default user account in Web Help Desk to “admin”. The password will be set to “password”. At this point you should be able to log into Web Help Desk using those credentials. Of course you should immediately change the user account password to something more secure.